GED4WEB® General Settings Dialog
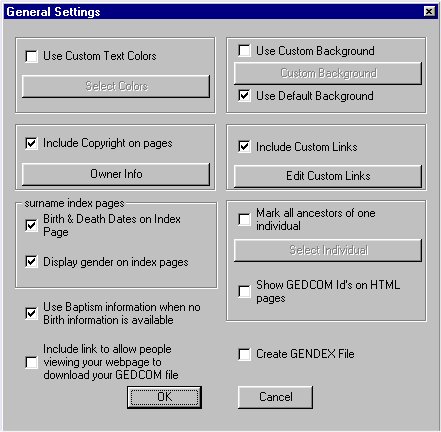
This screen contains:
-
Use Customer Text Colors and the Select Colors button
-
Use Customer Background, Use Default Background, and the
Custom Background button
-
Include Copyright on pages and the Owner Info button
-
Include Custom Links and Edit Custom Links button
-
Surname Index Pages - Birth & Death Dates on Index Page
and Display gender on index pages
-
Mark all ancestors of one individual, Show GEDCOM Id's on
HTML pages, and the Select Individual button
-
Use Baptism information when no Birth information is
available
-
Include link to allow people viewing your webpage to
download your GEDCOM file
-
Create GENDEX File

1. Use Customer Text Colors and the Select Colors button
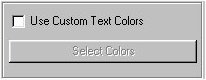
You can specifiy the colors used to Husband & Wife,
Children, and Parents. If you check this box, you can then select the
colors. You many specify them by RGB code, or select from the default
windows choices.
2. Use Customer Background, Use Default Background, and the
Custom Background button
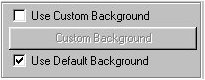
Use Custom background allows you to specifiy the background JPG
or GIF image that will be used for all images. When you check this box,
you will be able to press the 'Custom Background' button and specify the path to
the image. This image will be copied into the output directly with all the
other files.
Use Default Background allows you to use the faded pedigree
chart background image that I use on my website. I like it, I thought you
might also.
If you don't check either of these boxes, no background image
will be used.
3. Include Copyright on pages and the Owner Info button
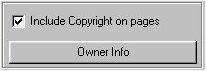
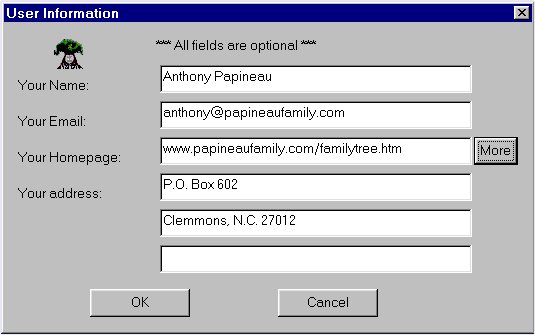
The Owner Info dialog is where you enter in your contact
information. You can leave any and all of these fields blank. But if
you don't put in your name and email address, people (probably your cousins)
interested in sharing information with you will not know how to contact you.
If you check the 'Include Copyright on pages' box, the name you
put in the 'Your Name' field will be put on the bottom of each page with
'copyright' next to it.
4. Include Custom Links and Edit Custom Links button
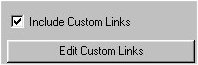
Many people asked for the ability to include links to pages that
they create, or other websites. I added the Custom Links section for this
reason. If you press the Edit Custom Links button, you will see a dialog
that allows you to specify the webpage address for as many links as you
like. These links will be placed near the bottom of the main page (index.htm).
If you are creating pages in more than one language, you must add the links for
the different languages separatly. Click on
this link to get more details about the Edit Custom Links dialog.
5. Surname Index Pages - Birth & Death Dates on Index Page
and Display gender on index pages
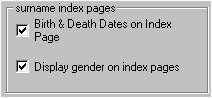
For each of the 4 categories of pages (Family, Descendancy,
Pedigree, and Notes), GED4WEB creates index pages with the names of all the
individuals on these pages. One page is created for each letter of the
alphabet. When these pages are created you have the option to include
birth & death dates (if known), as well as Male or Female (if known).
As with all pages, if you have selected to suppress dates for living
individuals, they will also be suppressed on the index pages.
6. Mark all ancestors of one individual, Show GEDCOM Id's on
HTML pages, and the Select Individual button
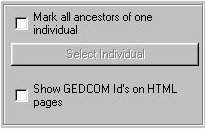
This is one of my favorite features. This allows you to
mark all your ancestors with a red dot  ,
allowing anyone viewing your pages to know if a name they found on your pages is
a direct ancestor or just a relative of an ancestor. When I get an email
from someone identifying a person they found on my webpage (who they are related
to) I look for a red dot to see quickly if this person is one of my ancestors
also. I find this a great time saving feature.
,
allowing anyone viewing your pages to know if a name they found on your pages is
a direct ancestor or just a relative of an ancestor. When I get an email
from someone identifying a person they found on my webpage (who they are related
to) I look for a red dot to see quickly if this person is one of my ancestors
also. I find this a great time saving feature.
If you want to mark all ancestors of a particular person (I use
my son, so I also get my wife's ancestors), you check this box and press the
Select Individual' button. You then enter their GEDCOM Id into the
Identify All Ancestors Of This Individual dialog.
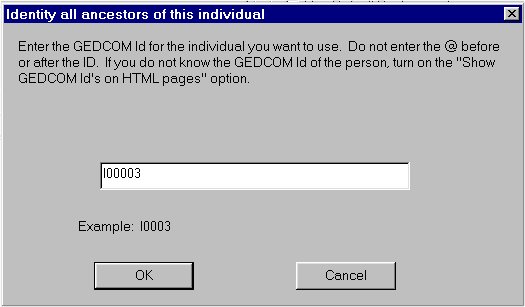
If you don't know their GEDCOM Id, check the Show GEDCOM Id's on
HTML pages box, and create the pages one time. Then, once you find out
their GEDCOM Id, you can uncheck the box and fill in the GEDCOM Id in the above
dialog box. This is case sensitive, so don't confuse your 'I' with a lower
case 'L'. The above example is an 'I'.
7. Use Baptism information when no Birth information is
available

This option allows you to tell GED4WEB that, if there is not
birth information for an individual, and there is baptism information, display
the baptism informaiton where birth information us normally diaplayed.
If this option is checked, burial information will also be used
when no death information is available.